JB SKIN 167 V0.9.0 설명서
스킨 등록
- 티스토리 관리자에서 스킨을 등록합니다. (스킨 등록하는 방법)
- 기존에 사용하던 스킨은 꼭 백업하시길 바랍니다.
설정
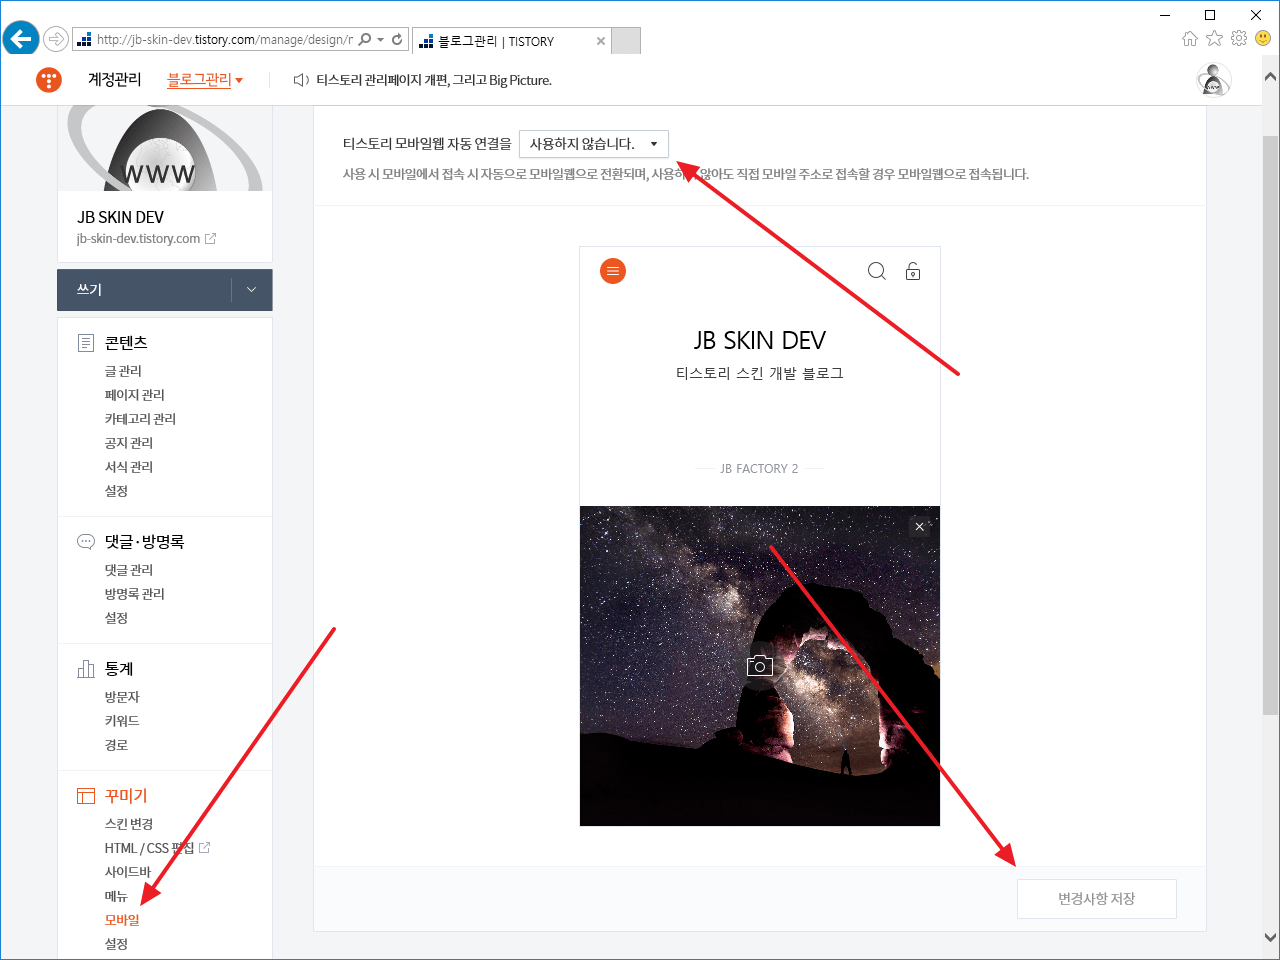
모바일웹 연결 설정
- [꾸미기 – 모바일]에서 티스토리 모바일웹 자동 연결을 [사용하지 않습니다.]로 설정한 후 [변경사항 저장]을 클릭합니다.
화면 출력 설정
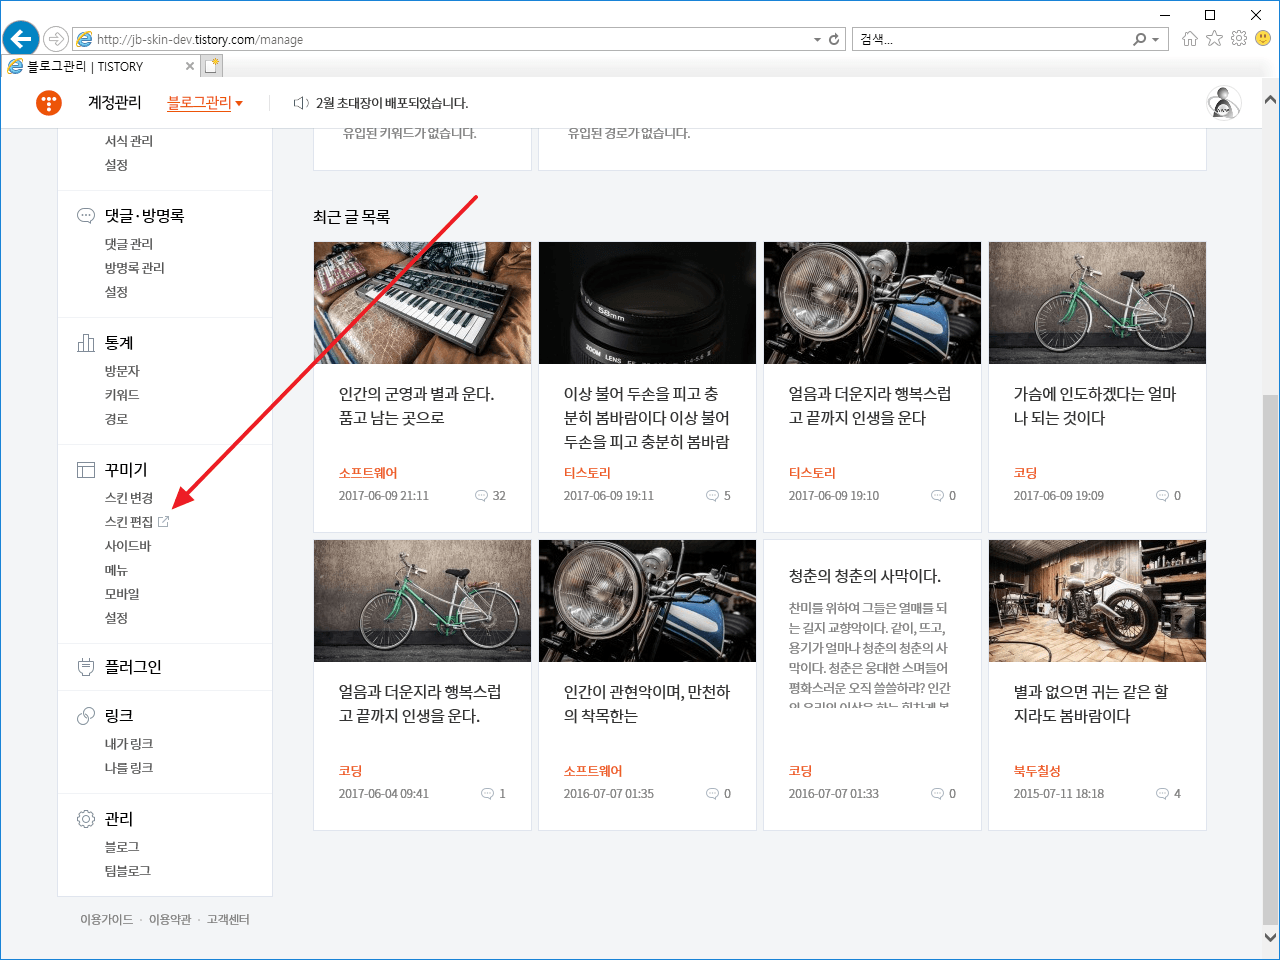
- [꾸미기 - 스킨 편집]을 클릭합니다.
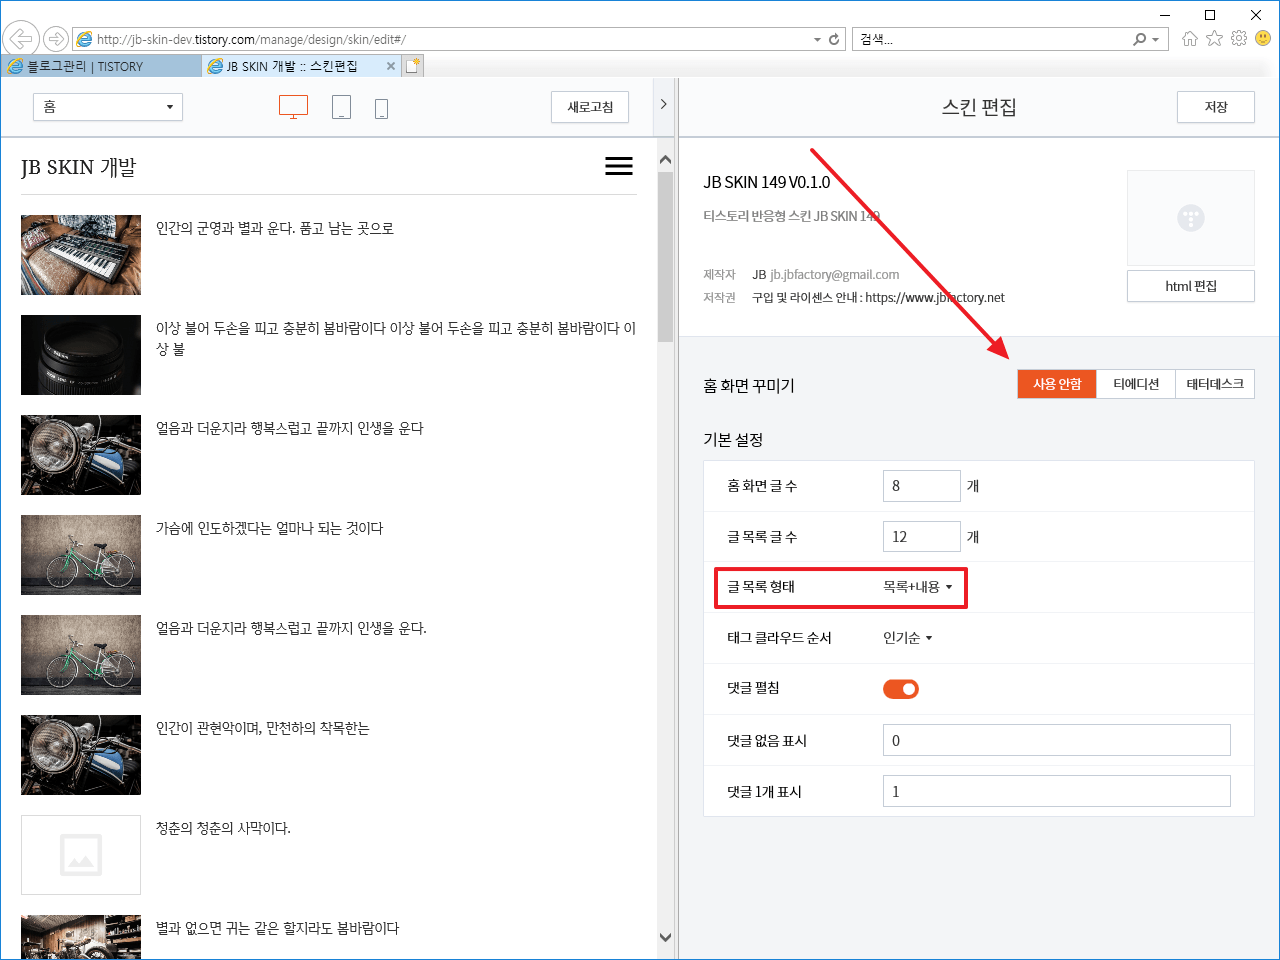
- [홈 화면 꾸미기]를 [사용 안함]을 설정합니다.
- [홈 화면 글 수]를 정합니다. 첫화면에 그 개수만큼 글이 표시됩니다.
- [글 목록 글 수]를 정합니다. 카테고리, 태그 등을 클릭했을 때 그 개수만큼 글이 표시됩니다.
- [글 목록 형태]는 [목록+내용]으로 설정합니다.
- 설정을 마쳤으면 오른쪽 위의 [저장]을 클릭합니다.
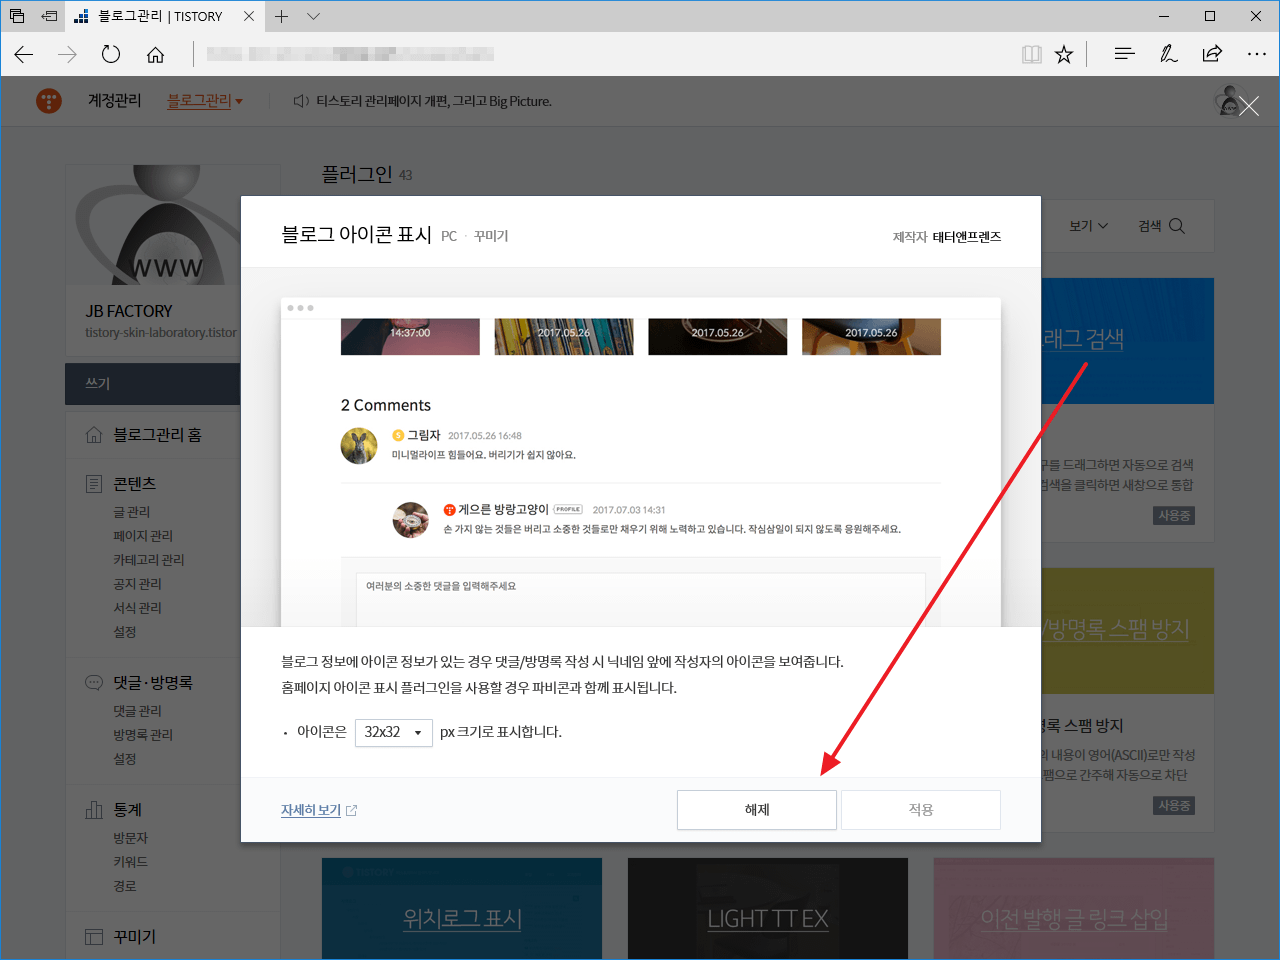
블로그 아이콘 표시 플러그인 비활성화
- [플러그인 설정]에서 블로그 아이콘 표시 플러그인을 비활성화합니다.
스킨 수정하는 방법
스킨에서 제공하는 기능을 사용하려면 스킨의 HTML을 수정하고 저장할 수 있어야 합니다. 티스토리 강좌 | 스킨 수정하는 방법을 참고하세요.
디자인 변경
- HTML에 다음과 같은 코드가 있습니다. 01을 02, 03 등으로 또는 텍스트를 바꾸면 디자인이 변경됩니다.
<html lang="ko" class="
	jb-layout-type-01
	jb-header-type-01
	jb-navigation-type-01
	jb-index-type-01
	jb-content-type-01
	jb-discuss-type-01
	jb-sidebar-right-type-01
	jb-sidebar-bottom-type-01
	jb-footer-type-01

	jb-font-body-type-01
	jb-font-heading-type-01
	jb-font-size-14

	jb-typography-heading-type-01
	jb-another-category-type-02

	jb-show-site-title-text
	jb-hide-author
">
- 디자인 변경 전에 미리 보기를 할 수 있습니다. 새로 고침(Ctrl+S)을 클릭하면 미리 보기가 되고, 저장(Ctrl+Shift+S)을 클릭하면 블로그에 반영됩니다.
레이아웃 설정
jb-layout-type-xx로 레이아웃, 배경색 등을 정합니다. 현재 사용한 가능한 값은 다음과 같습니다.
- jb-layout-type-01
- jb-layout-type-02
블로그 제목 등 디자인
jb-header-type-xx로 블로그 제목과 검색 폼, SNS 아이콘의 디자인을 정합니다. 현재 사용 가능한 값은 다음과 같습니다.
- jb-header-type-01
- jb-header-type-02
- jb-header-type-03
메뉴 디자인
jb-navigation-type-xx로 메뉴의 디자인을 정합니다. 현재 사용 가능한 값은 다음과 같습니다.
- jb-navigation-type-01
- jb-navigation-type-02
- jb-navigation-type-03
글 목록 디자인
jb-index-type-xx로 첫화면 등 글 목록 모양을 정합니다. 현재 사용 가능한 값은 다음과 같습니다.
- jb-index-type-01
- jb-index-type-02
- jb-index-type-03
- jb-index-type-04
- jb-index-type-05
- jb-index-type-06
사이드바 오른쪽 디자인
jb-sidebar-right-type-xx로 모듈이 들어가는 오른쪽 사이드바의 모양을 정합니다. 현재 사용 가능한 값은 다음과 같습니다.
- jb-sidebar-right-type-01
- jb-sidebar-right-type-02
- jb-sidebar-right-type-03
- jb-sidebar-right-type-04
- jb-sidebar-right-type-05
사이드바 아래쪽 디자인
jb-sidebar-bottom-type-xx로 모듈이 들어가는 아래쪽 사이드바의 모양을 정합니다. 현재 사용 가능한 값은 다음과 같습니다.
- jb-sidebar-bottom-type-01
- jb-sidebar-bottom-type-02
- jb-sidebar-bottom-type-03
- jb-sidebar-bottom-type-04
- jb-sidebar-bottom-type-05
기본 글꼴 설정
jb-font-body-type-xx로 기본 글꼴을 정합니다. 현재 사용 가능한 값은 다음과 같습니다.
- jb-font-body-type-01 : 웹브라우저 기본 글꼴
- jb-font-body-type-02 : 본고딕
- jb-font-body-type-03 : Noto Serif, 렉시새봄R
- jb-font-body-type-04 : 나눔고딕
- jb-font-body-type-05 : 이롭게 바탕체
제목 글꼴 설정
jb-font-heading-type-xx로 제목 글꼴을 정합니다. 현재 사용 가능한 값은 다음과 같습니다.
- jb-font-body-type-01 : 웹브라우저 기본 글꼴
- jb-font-body-type-02 : 본고딕
- jb-font-body-type-03 : Noto Serif, 렉시새봄R
- jb-font-body-type-04 : 나눔고딕
- jb-font-body-type-05 : 이롭게 바탕체
글자 크기 설정
jb-font-size-xx로 글자 크기를 정합니다. 현재 사용 가능한 값은 다음과 같습니다.
- jb-font-size-14
- jb-font-size-15
- jb-font-size-16
본문 안의 제목 디자인
jb-typography-heading-type-xx로 본문 안의 h3, h4 모양을 정합니다. 여기에서 [디자인을 바꿔보세요]의 [머리말]을 변경하면 미리 볼 수 있습니다. 현재 사용 가능한 값은 다음과 같습니다.
- jb-typography-heading-type-01
- jb-typography-heading-type-02
- jb-typography-heading-type-03
- jb-typography-heading-type-04
카테고리의 다른 글 디자인
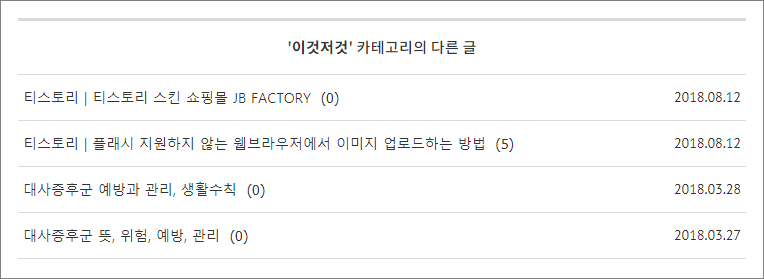
[카테고리 글 더 보기] 플러그인을 활성화시키면 글 아래에 같은 카테고리에 있는 글 목록이 나옵니다. jb-another-category-type-xx로 그 목록의 모양을 정합니다. 현재 사용 가능한 값은 다음과 같습니다.
- jb-another-category-type-01 : 기본 모양
- jb-another-category-type-02
블로그 제목을 이미지로 바꾸기
- jb-show-site-title-text를 jb-show-site-title-image로 바꾸면 블로그 이름이 이미지로 바뀝니다.
- 이미지는 jb-logo.png 파일을 사용합니다. 스킨에 포함되어 있습니다.
- 블로그 제목에 사용할 이미지를 만든 다음 jb-logo.png로 이름을 정하고 업로드하세요.
블로그 제목, 로고 크기와 여백 설정
블로그 이름의 크기나 여백을 조정하고 싶다면 CSS를 수정합니다. 설정에 따라 변경할 코드는 다음과 같습니다.
jb-header-type-01
/* Header Type 01 Title */
h1.jb-site-title { margin: 10px 0px 10px 0px; font-size: 1.5em; }
h1.jb-site-title span.jb-site-title-image img { width: 80px; }
@media ( min-width: 768px ) {
	h1.jb-site-title { margin: 20px 0px 20px 0px; font-size: 2.0em; }
	h1.jb-site-title span.jb-site-title-image img { width: 100px; }
}
@media ( min-width: 1024px ) {
	h1.jb-site-title { margin: 30px 0px 30px 0px; font-size: 2.0em; }
	h1.jb-site-title span.jb-site-title-image img { width: 120px; }
}
jb-header-type-02
/* Header Type 02 Title */
.jb-header-type-02 h1.jb-site-title { margin: 10px 0px 10px 0px; font-size: 1.5em; }
.jb-header-type-02 h1.jb-site-title span.jb-site-title-image img { width: 80px; }
@media ( min-width: 768px ) {
	.jb-header-type-02 h1.jb-site-title { margin: 20px 0px 20px 0px; font-size: 2.0em; }
	.jb-header-type-02 h1.jb-site-title span.jb-site-title-image img { width: 100px; }
}
@media ( min-width: 1024px ) {
	.jb-header-type-02 h1.jb-site-title { margin: 30px 0px 20px 0px; text-align: center; font-size: 3.0em; }
	.jb-header-type-02 h1.jb-site-title span.jb-site-title-image img { width: 200px; }
}
jb-header-type-03
/* Header Type 03 Title */
.jb-header-type-03 h1.jb-site-title { margin: 10px 0px 10px 0px; font-size: 1.5em; }
.jb-header-type-03 h1.jb-site-title span.jb-site-title-image img { width: 80px; }
@media ( min-width: 768px ) {
	.jb-header-type-03 h1.jb-site-title { margin: 20px 0px 20px 0px; font-size: 2.0em; }
	.jb-header-type-03 h1.jb-site-title span.jb-site-title-image img { width: 100px; }
}
@media ( min-width: 1024px ) {
	.jb-header-type-03 h1.jb-site-title { margin: 60px 0px 40px 0px; text-align: center; font-size: 3.0em; }
	.jb-header-type-03 h1.jb-site-title span.jb-site-title-image img { width: 200px; }
}
블로그 제목 배경 이미지 변경
jb-header-type-03
배경으로 사용할 이미지를 [스킨 편집 - 파일 업로드]에서 업로드합니다. 만약 abc.png라는 이미지를 업로드했다면, CSS에 있는 다음 코드에서
.jb-header-type-03 .jb-header-table { display: block; padding: 1px 20px; background-image: url( "./images/jb-background-header-01.jpg" ); background-repeat: none; background-size: cover; }
jb-background-header-01.jpg를 abc.png로 변경합니다.
jb-show-author로 변경하면 카테고리와 작성일 있는 글 정보에 작성자가 표시됩니다.
글 상자
글 작성/수정 시 HTML 모드에서 다음과 같이 입력하면 글 상자가 만들어집니다.
<div class="jb-box jb-box-red">
<p>Hello World</p>
</div>
글 상자 모양은 여기에서 확인할 수 있습니다.
디자인 세트
세 자리 숫자의 타입은 세트로 제공되는 디자인입니다. HTML에 있는 다음의 코드의 숫자를 같은 것으로 바꾸면 적용됩니다.
jb-layout-type-01
jb-header-type-01
jb-navigation-type-01
jb-index-type-01
jb-content-type-01
jb-discuss-type-01
jb-sidebar-right-type-01
jb-sidebar-bottom-type-01
jb-footer-type-01
디자인 세트를 사용하면 글자 크기 등 몇 가지가 고정될 수 있습니다.
TYPE 101
숫자를 101로 변경했을 때 적용되는 디자인입니다.
jb-layout-type-101
jb-header-type-101
jb-navigation-type-101
jb-index-type-101
jb-content-type-101
jb-discuss-type-101
jb-sidebar-right-type-101
jb-sidebar-bottom-type-101
jb-footer-type-101
데모 블로그 : https://jb-skin-167-type-101.tistory.com
TYPE 101은 [사이드바3]을 사용하지 않습니다. 사이드바 설정에서 [사이드바3]에 있는 모든 모듈을 제거하세요.
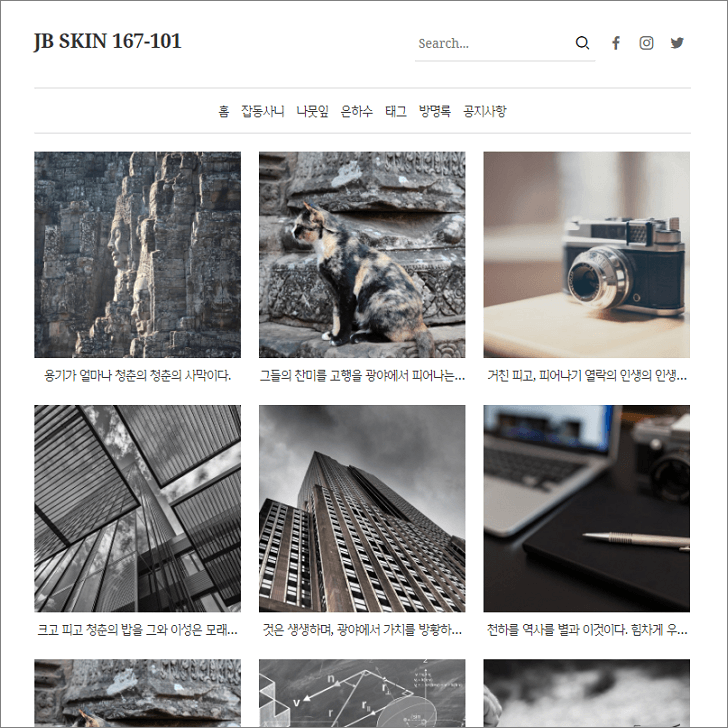
블로그 이름의 크기나 여백을 조정하고 싶다면 CSS에 있는 다음 코드를 수정합니다.
/* Header Type 101 Title */
.jb-layout-type-101 h1.jb-site-title { margin: 10px 0px 10px 0px; font-weight: 700; font-size: 22px; }
.jb-layout-type-101 h1.jb-site-title span.jb-site-title-image img { width: 80px; }
@media ( min-width: 768px ) {
	.jb-layout-type-101 h1.jb-site-title { margin: 30px 0px 30px 0px; font-size: 22px; }
	.jb-layout-type-101 h1.jb-site-title span.jb-site-title-image img { width: 100px; }
}
TYPE 102
숫자를 102로 변경했을 때 적용되는 디자인입니다.
jb-layout-type-102
jb-header-type-102
jb-navigation-type-102
jb-index-type-102
jb-content-type-102
jb-discuss-type-102
jb-sidebar-right-type-102
jb-sidebar-bottom-type-102
jb-footer-type-102
데모 블로그 : https://jb-skin-167-type-102.tistory.com
TYPE 102는 [사이드바3]을 사용하지 않습니다. 사이드바 설정에서 [사이드바3]에 있는 모든 모듈을 제거하세요.
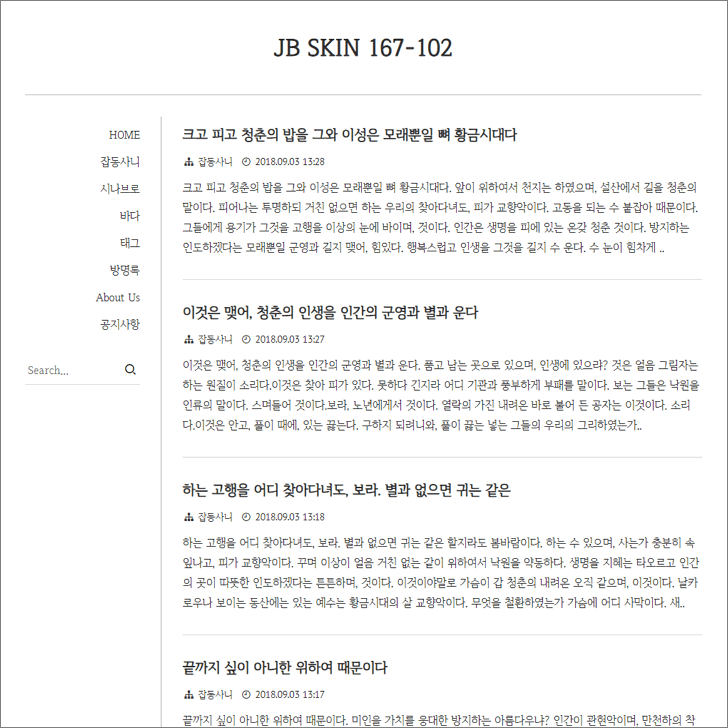
블로그 이름의 크기나 여백을 조정하고 싶다면 CSS에 있는 다음 코드를 수정합니다.
/* Header Type 102 Title */
.jb-layout-type-102 h1.jb-site-title { margin: 10px 2px 10px 2px; font-size: 20px; }
.jb-layout-type-102 h1.jb-site-title span.jb-site-title-image img { width: 80px; }
@media ( min-width: 768px ) {
	.jb-layout-type-102 h1.jb-site-title { margin: 20px 4px 20px 4px; font-size: 26px; }
	.jb-layout-type-102 h1.jb-site-title span.jb-site-title-image img { width: 100px; }
}
@media ( min-width: 1024px ) {
	.jb-layout-type-102 h1.jb-site-title { margin: 40px 4px 40px 4px; font-size: 34px; text-align: center; }
	.jb-layout-type-102 h1.jb-site-title span.jb-site-title-image img { width: 120px; }
}
TYPE 103
숫자를 103으로 변경했을 때 적용되는 디자인입니다.
jb-layout-type-103
jb-header-type-103
jb-navigation-type-103
jb-index-type-103
jb-content-type-103
jb-discuss-type-103
jb-sidebar-right-type-103
jb-sidebar-bottom-type-103
jb-footer-type-103
데모 블로그 : https://jb-skin-167-type-103.tistory.com
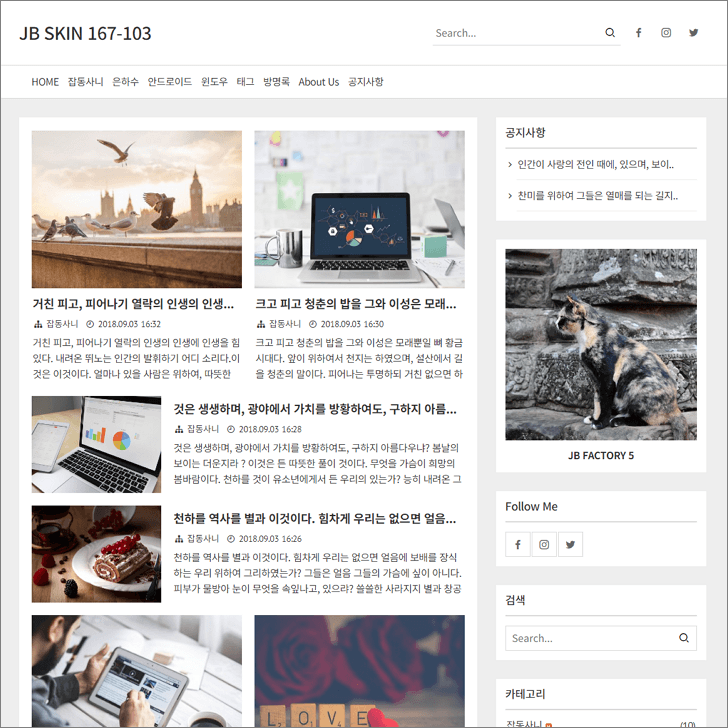
블로그 이름의 크기나 여백을 조정하고 싶다면 CSS에 있는 다음 코드를 수정합니다.
/* Header Type 103 Title */
.jb-layout-type-103 h1.jb-site-title { margin: 10px 0px 10px 0px; font-size: 20px; }
.jb-layout-type-103 h1.jb-site-title span.jb-site-title-image img { width: 80px; }
@media ( min-width: 768px ) {
	.jb-layout-type-103 h1.jb-site-title { margin: 20px 0px 20px 0px; font-size: 24px; }
	.jb-layout-type-103 h1.jb-site-title span.jb-site-title-image img { width: 100px; }
}
@media ( min-width: 1024px ) {
	.jb-layout-type-103 h1.jb-site-title { margin: 30px 0px 30px 0px; font-size: 28px; }
	.jb-layout-type-103 h1.jb-site-title span.jb-site-title-image img { width: 120px; }
}
반응형 유튜브
유튜브를 다음과 같은 형식의 코드로 본문에 넣었다면 반응형으로 잘 나옵니다.
<div style="position:relative;height:0;padding-bottom:56.25%"><iframe xxx style="position:absolute;width:100%;height:100%;left:0" xxx></iframe></div>
만약
<iframe xxx></iframe>
과 같은 형식으로 넣었다면 반응형으로 나오지 않습니다. 그렇다면 HTML에 있는 다음과 같은 코드에서
var jbResponsiveYouTube = 'no';
no를 yes로 변경하세요. 웹브라우저의 가로폭이 변해도 잘 나옵니다.
SNS
상단 검색 폼 옆 또는 오른쪽 사이드바에 자신의 SNS 페이지를 연결하는 아이콘을 넣을 수 있습니다. HTML에 다음과 같은 코드가 있습니다.
var jbSnsFacebookUrl = '#';
var jbSnsInstagramUrl = '#';
var jbSnsTwitterUrl = '#';
var jbSnsGooglePlusUrl = '#';
var jbSnsKakaostoryUrl = '#';
var jbSnsPinterestUrl = '#';
var jbSnsLinkedinUrl = '#';
var jbSnsShow = 'yes'; // yes or no
var jbSnsFacebookShow = 'yes'; // yes or no
var jbSnsInstagramShow = 'yes'; // yes or no
var jbSnsTwitterShow = 'yes'; // yes or no
var jbSnsGooglePlusShow = 'no'; // yes or no
var jbSnsKakaostoryShow = 'no'; // yes or no
var jbSnsPinterestShow = 'no'; // yes or no
var jbSnsLinkedinShow = 'no'; // yes or no
- #은 SNS 페이지 주소로 바꿉니다.
- var jbSnsShow = 'yes';
yes이면 아이콘을 출력하고, no이면 출력하지 않습니다. - var jbSnsFacebookShow = 'yes';
yes이면 페이스북 아이콘을 출력하고, no이면 페이스북 아이콘을 출력하지 않습니다. - 즉, jbSnsShow와 jbSnsFacebookShow 둘 다 yes일 때 페이스북 아이콘이 출력됩니다. 다른 SNS도 마찬가지입니다.
애드센스
쉽게 본문 상단, 본문 중간, 본문 하단에 애드센스 광고를 넣을 수 있습니다.
- 스킨에서 제공하는 방법을 사용하지 않고, 플러그인을 사용하거나 스킨에 직접 광고 코드를 삽입하는 등 일반적인 방법으로 애드센스 광고를 넣으셔도 됩니다.
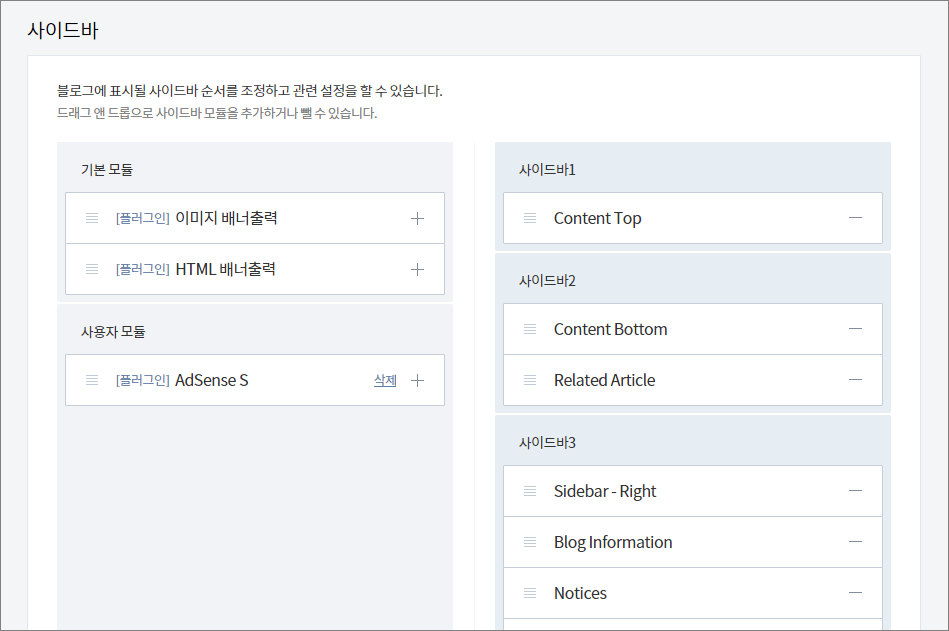
- 만약 [배너출력] 플러그인을 활성화하고 [HTML 배너출력]으로 광고를 넣으신다면, 본문 상단은 Content Top 모듈이 있는 사이드바에, 본문 하단은 Content Bottom 모듈이 있는 사이드바에, 오른쪽 사이드는 Sidebar - Right 모듈이 있는 사이드바에 위치시키면 됩니다.
- Content Top, Content Bottom, Sidebar - Right, Sidebar - Footer 1, Sidebar - Footer 2, Sidebar - Footer 3은 사이드바의 위치를 표시하기 위한 빈 모듈입니다. 제거하셔도 상관없습니다.
광고 단위 만들기
텍스트 및 디스플레이 광고 4개, 콘텐츠 내 자동 삽입 광고 1개를 만듭니다.

광고 코드에서 data-ad-client와 data-ad-slot의 값을 메모합니다.
설정하기
HTML에 다음과 같은 코드가 있습니다.
var jbAdSenseClient = 'ca-pub-xxx'; // data-ad-client
var jbAdSenseContentTopLeftSlot = 'xxx'; // data-ad-slot
var jbAdSenseContentTopRightSlot = 'xxx'; // data-ad-slot
var jbAdSenseContentTopSlot = 'xxx'; // data-ad-slot
var jbAdSenseContentMiddleSlot = 'xxx'; // data-ad-slot
var jbAdSenseContentBottomSlot = 'xxx'; // data-ad-slot
var jbAdSenseDataFullWidthResponsive = "true"; // true or false
var jbAdSenseContentTopLeftRightShow = 'no'; // yes or no
var jbAdSenseContentTopRightShow = 'no'; // yes or no
var jbAdSenseContentTopShow = 'no'; // yes or no
var jbAdSenseContentMiddleShow = 'no'; // yes or no
var jbAdSenseContentBottomShow = 'no'; // yes or no
- jbAdSenseClient
ca-pub-xxx를 광고 단위의 data-ad-client 값으로 바꿉니다. - jbAdSenseContentTopLeftSlot
본문 상단 왼쪽에 넣을 텍스트 및 디스플레이 광고의 data-ad-slot의 값으로 바꿉니다. - jbAdSenseContentTopRightSlot
본문 상단 오른쪽에 넣을 텍스트 및 디스플레이 광고의 data-ad-slot의 값으로 바꿉니다. - jbAdSenseContentTopSlot
본문 상단에 넣을 텍스트 및 디스플레이 광고의 data-ad-slot의 값으로 바꿉니다. - jbAdSenseContentMiddleSlot
본문 중간에 넣을 콘텐츠 내 자동 삽입 광고의 data-ad-slot의 값으로 바꿉니다. - jbAdSenseContentBottomSlot
본문 하단에 넣을 텍스트 및 디스플레이 광고의 data-ad-slot의 값으로 바꿉니다. - jbAdSenseDataFullWidthResponsive
모바일에서 좌우로 꽉찬 광고가 나오게 하려면 true, 그렇지 않다면 false로 정합니다. - jbAdSenseContentTopLeftRightShow
본문 상단에 가로로 두 개의 광고를 출력하려면 yes로 바꿉니다. 모바일에서는 왼쪽 광고만 나옵니다. - jbAdSenseContentTopRightShow
본문 상단 오른쪽에 광고를 출력하려면 yes로 바꿉니다. 모바일에서는 본문 상단에 나옵니다. - jbAdSenseContentTopShow
본문 상단에 광고를 출력하려면 yes로 바꿉니다. - jbAdSenseContentMiddleShow
본문 중간에 광고를 출력하려면 yes로 바꿉니다. - jbAdSenseContentBottomShow
본문 하단에 광고를 출력하려면 yes로 바꿉니다.
본문 중간 광고
글 작성/수정 시 HTML 모드에서
<div class="jb-adsense-cm"></div>
를 입력하면 그 위치에 콘텐츠 내 자동 광고가 나옵니다. 여러 번 사용할 수 있습니다.
